Plugin with output only
This example will create a new plugin that will display the perimeter and area of all the boxes that are drawn on the map.
Creating a basic panel
The first step is to create a plugin that outputs some static text. Create a file called
BoxInfo.jsin thepluginsdirectory.Open this file in a text editor and add the following:
Ext.ns("myapp.plugins");

myapp.plugins.BoxInfo = Ext.extend(gxp.plugins.Tool, {

  ptype: "myapp_boxinfo",

  addOutput: function(config) {
    return myapp.plugins.BoxInfo.superclass.addOutput.call(this, Ext.apply({
      title: "Box info",
      html: "This is where the box info will be shown"
    }, config));
  }

});

Ext.preg(myapp.plugins.BoxInfo.prototype.ptype, myapp.plugins.BoxInfo);
This plugin will only implement theaddOutputfunction to create a panel with a title and some content.
Connecting to the application
To add the BoxInfo plugin to the application, edit
src/app/app.jsand include the dependency at the top of the file:* @require plugins/BoxInfo.js
Add a container for the output to the
itemssection of theportalConfigdefinition insrc/app/app.js:}, { id: "southpanel", xtype: "container", layout: "fit", region: "south", height: 100 }],
In the
toolssection, add an entry for the “boxinfo” tool and direct its output to the south panel:}, { ptype: "myapp_boxinfo", outputTarget: "southpanel" }],
Restart the SDK and reload the application in the browser to see the results:
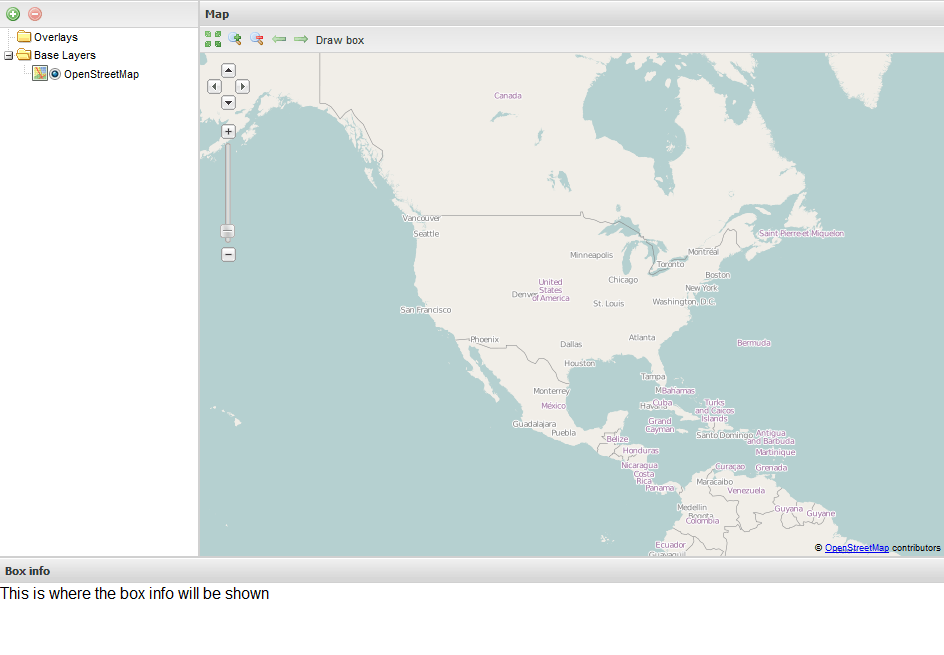
Adding an information box to the application
Adding dynamic content
To connect this panel to dynamic content, it needs a reference to the vector
boxLayerthat is created by theDrawBoxtool. This reference is established by attaching anidto the DrawBox tool inapp.js. The BoxInfo tool will then reference thisidvalue. Add theidtoapp.jsafterptype: "myapp_drawbox"and beforeactiontarget: "map.tbar".}, { ptype: "myapp_drawbox", id: "drawbox", actionTarget: "map.tbar" }, {
Add the reference to the boxinfo config, between
ptype: "myapp_boxinfo"andoutputTarget: "southpanel":}, { ptype: "myapp_boxinfo", boxTool: "drawbox", outputTarget: "southpanel" }],
Now, switching back over to
BoxInfo.js, replace theaddOutputfunction of the BoxInfo tool with the following code. With this change, the application will depict information about the box that has been drawn.boxTool: null, tplText: 'Area: {area}, Perimeter: {length}', title: "Box info", addOutput: function(config) { if (this.boxTool !== null) { var layer = this.target.tools[this.boxTool].boxLayer; layer.events.on({ featureadded: this.addFeature, scope: this }); this.tpl = new Ext.Template(this.tplText); } return myapp.plugins.BoxInfo.superclass.addOutput.call(this, Ext.apply({ title: this.title, autoScroll: true }, config)); },
In the above code, the
boxToolstring identifier finds the DrawBox tool so that it can get a reference to itsboxLayerproperty.Add the following code below the code added in the previous step:
  addFeature: function(evt) {
    var geom = evt.feature.geometry,
      output = this.output[0];
    output.add({html: this.tpl.applyTemplate({area: geom.getArea(), length: geom.getLength()})});
    output.doLayout();
  }
When a feature is added to the
boxLayer, the code adds a panel to the output container. The content is generated using anExt.Template.Reload the application as before. Draw a few boxes on the map and verify that the container at the bottom will display information about the boxes:
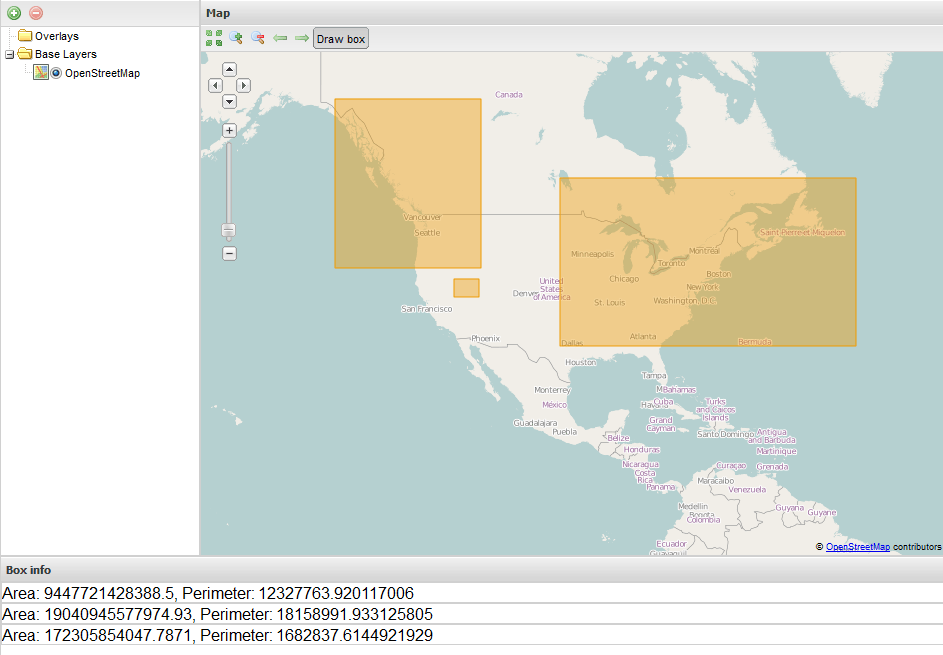
Box info showing area and perimeter
Note
To adjust the output, use the
tplTextparameter and theoutputConfigsection of the tool insrc/app/app.js. For example, the following code would display only the area and turn off autoscrolling:ptype: "myapp_boxinfo", boxTool: "drawbox", tplText: "AREA: {area}", outputTarget: "southpanel", outputConfig: { title: "Box info", autoScroll: false }
Download the BoxInfo.js and app.js files created in this section.